Microsoft Access Developer Tips from Xlteq
Let’s first look at how a crosstab query works. For those that are more familiar with Excel Spreadsheets, this would be the equivalent of a pivot table.
A crosstab query enables you to display and summarise the data in a format that is easier to read and understand. The information displayed is aggregated to a summarised value such as Sum, Average, Count, etc. The data is displayed by each row and a value that represents the column data.
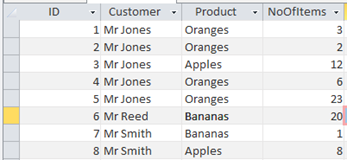
Consider the following list.
By placing a Crosstab across the Product range, we can pivot the data into something that is easier to read.
To create a new Crosstab query, create a new query and select Crosstab from the Ribbon.
Ribbon: Query Design > Query Type > Crosstab Query
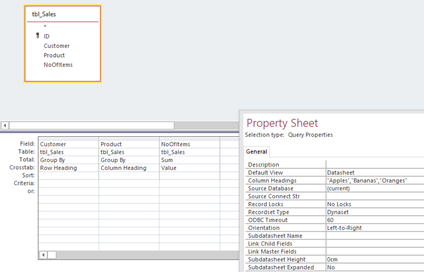
Add a new table and insert the values as shown below.
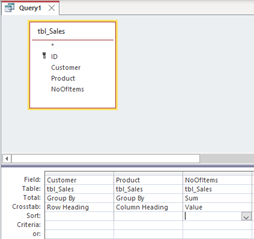
The result creates a column for each Product and a row for each unique Customer. The results for each product No Of Items are then added together.
This is how the results look.
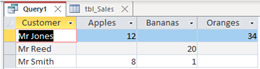
With this result, the fields have now become the Row Source value(s) you have specified and the new column created fields (Apples, Bananas and Oranges).
Displaying Crosstab Data
A crosstab query is a great tool at make data easier to read. However, displaying the data from a crosstab query in a form or report requires some further understanding.
The reason is due to new fields are created when using a Crosstab query.
In our previous example, 3 new fields are created. Namely, Apples, Bananas and Oranges.
There are two methods you can use in order to display the data.
Crosstab Column Headings
In the properties window in the crosstab query, there is an option to add Column Headings.
This allows you to specify the column names that will be used in the query. If you know the values you are pivoting on (in our example this was the Product). Then you can list the column names you expect. In this instance you would add the values “Apples”;”Bananas”;”Oranges”
The values must be typed precisely as they are in the table. If you spelt Bananas incorrectly, the column name would still appear (spelt incorrectly) but the aggregate total would be empty.
The advantage of specifying the heading names mean that even if the value doesn’t exist (i.e. No one bought bananas), the column name would still exist. When assigning the dataset to a form, the dataset would return all of the expected values so the form would run without error.
The disadvantage is clear. If a new product is added to the table, plums for example, the query would have to be altered to include plums in the column headings list.
How To Display Crosstab Data Without Using Column Headings
In order to create a dynamic form that can adapt to changing field names returned from a Crosstab query, the form itself needs to adapt.
In this section we will cover how to:
- Create a New Form and link it to the Crosstab query.
- Create Fields that are Unbound with a generic name and numbered.
- How to iterate through the Crosstab data and extract the necessary field names.
- How To apply those field names to each text box in a form.
Firstly we need to create a new form.
In the ribbon we need to select:
Ribbon > Create > Forms > Form Design.
- Set the record source of the form to the crosstab query.
- Set the Default View to Datasheet.
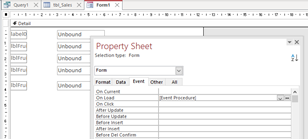
- Create several textbox controls on the form. Create as many controls as you believe you will need to future proof the form. So in our example, if you think only 30 varieties of fruit will ever be used. Create 30 text boxes.
- Give each textbox a generic name and a number to act as a counter. E.e. txtFruit1, txtFruit2
- Give each label tagged to the textbox a generic name and counter. lblFruit1, lblFruit2.
- Add the other fields from the crosstab query, those that are not created due to the pivot values.
- Create a new event in the Form Load properties. As shown below.
The Visual Basic Code For Generic Text Boxes
Before I delve into the code you will need, it’s worth understanding what it is we are trying to achieve.
In a standard form, you would normally specify the record source, in this case it’s the crosstab query. You would then apply the fields from the data source into the text boxes we’ve created.
In this case, you can only apply the fields that are unchanging, the regular fields from the dataset – not the pivoted values.
So we need to use VBA to populate the text boxes. The VBA will apply the following values.
- The text box control source.
- The label name for each control.
- Hide any generic text boxes that aren’t being used.
Before we start with the code, there is a slight modification that is required in the crosstab query.
Because the column names could be named anything, we need a means of identifying those pivoted fields. To do this, we will assign a symbol that is unlikely to be used in a regular named field.
Go back into the crosstab query and apply the following concatenation to the Column Heading field.
“^” & [ProductName]
This will denote each field that is pivoted with the hat symbol. So now Apples will read ^Apples.
Save the crosstab query and return to the form.
In the Form Load event, click the build button (A button with 3 dots)
Add the following code to the Visual Basic Window.
Private Sub Form_Load()
Dim db As DAO.Database
Dim rst As DAO.Recordset
Dim iCounter As Long
iCounter = 1
'Sets the variable name DB to the current database
Set db = CurrentDb()
'Sets the variable rst to the dataset. Here is where you should add the name of the Crosstab query.
Set rst = db.OpenRecordset("qry_Crosstab_Fruit") 'CHANGE THE CROSTAB QUERY TO YOUR QUERY NAME
'Iterates through each of the field names being returned from the Crosstab query.
'Here is where we need to identify our new pivoted fields.
'Because we have assigned the (hat symbol ^) to the pivoted headings, we can look for this in the field name
'Initial start up, hides all of the generic textboxes
For NoOfTextBoxes = 1 To 5
Form.Controls("txtFruit" & NoOfTextBoxes).ColumnHidden = True
Next
For Each fld In rst.Fields
If InStr(fld.Name, "^") > 0 Then 'Checks that the field contains the hat symbol
vSource = fld.Name
vLabel = fld.Name
Form.Controls("txtFruit" & iCounter).ControlSource = vSource 'Applies the control source
Form.Controls("txtFruit" & iCounter).ColumnHidden = False 'Ensures the textbox is visible.Because the form is a datasheet, we use ColunHidden instead of .visblle.
vLabel = Replace(vLabel, "^", "") 'Removes the hat symbol from the label name
Form.Controls("lblFruit" & iCounter).Caption = vLabel 'Applies the label name
iCounter = iCounter + 1 'Increases the counter so that the next control is ready.
If iCounter > 5 Then 'Checks that the number of iterations are not more than the number of generic controls
MsgBox "You need to add more generic controls.", vbCritical
Exit Sub
End If
End If
Next
'Tidy the data by closing all set variables
rst.Close
Set rst = Nothing
Set db = Nothing
End Sub
Final Notes:
If the form does not work, check the following:
- The crosstab query no longer has Column Name headings.
- Check that the symbol you have used (hat^ for example) is appearing in the crosstab column names.
- Check the textboxes are labelled correctly.
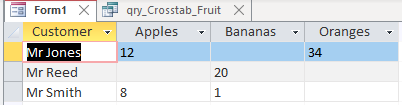
Finally, open the form. It should have the fields assigned correctly.